Easy Homemade Parmesan Crisps: Better Than Store-Bought in Minutes
Imagine a snack that’s incredibly easy to make, boasts a gourmet flavor, and offers an irresistible crispy texture – all in less time than it takes to queue at a coffee shop. That's the magic of homemade
parmesan crisps! While store shelves might offer various crispy cheese options, there's absolutely no comparison to the sublime experience of crafting your own. Forget bland, uniformly textured imitations; your kitchen is about to become a five-star deli, turning a simple block of cheese into delicate, lacy, flavor-packed bites that will have everyone asking for more.
This article isn't just a recipe; it's an invitation to unlock pure, unadulterated flavor and texture that manufactured versions simply can't replicate. We'll show you why making your own
parmesan crisps is not only foolproof but also significantly more rewarding, transforming everything from quick low-carb snacks to elegant meal garnishes.
Why Homemade Parmesan Crisps Trump Store-Bought Every Time
If you’ve ever sampled store-bought parmesan crisps, you know they can be *good*, but rarely *great*. There's often a subtle, almost indescribable "off" flavor, a hint of something processed that detracts from the pure cheese experience. This is where homemade
parmesan crisps shine, offering a superior taste and texture that sets them apart.
*
Pure, Unadulterated Flavor: With homemade crisps, the star ingredient, Parmesan cheese, takes center stage without any artificial interference. You get the full, rich, nutty depth of high-quality Parmesan. Manufactured versions, to ensure shelf stability and mass appeal, sometimes include preservatives or anti-caking agents that subtly alter the genuine cheese flavor. When you make them yourself, it's just cheese, pure and simple.
*
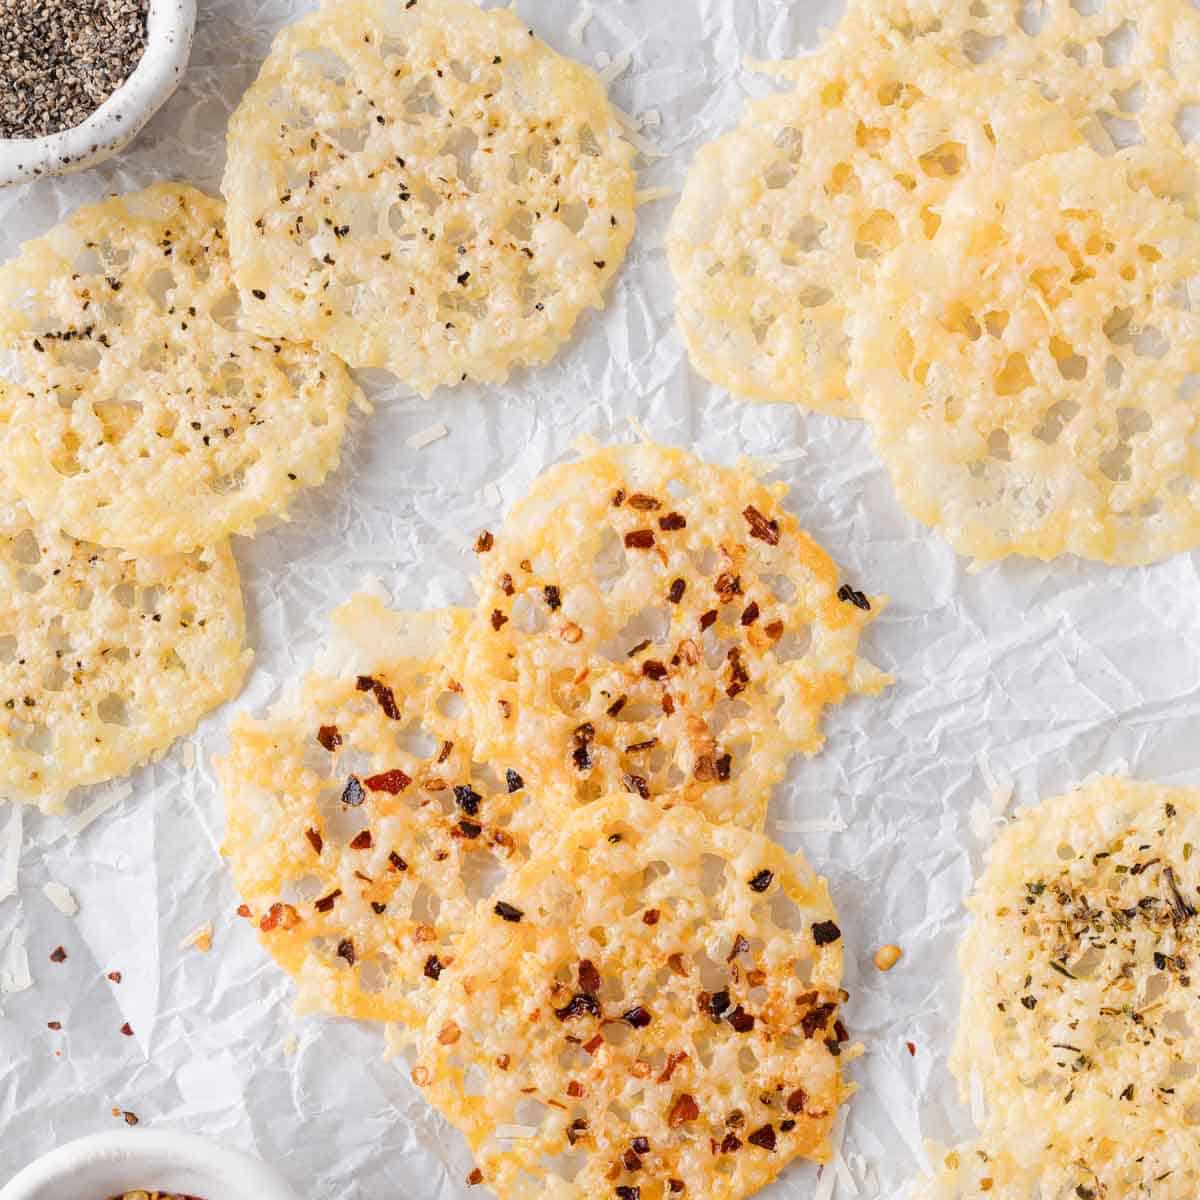
Delicate, Lacy Texture: This is arguably the biggest differentiator. Store-bought crisps tend to be uniform and dense, sometimes brittle but lacking true delicacy. Homemade crisps, when done right, boast a beautiful, intricate lacy pattern. This delicate structure provides an ethereal crunch that melts in your mouth, offering a far more satisfying textural experience than any mass-produced alternative. The way the fat renders and the cheese caramelizes creates these unique, irresistible airy pockets.
*
Ingredient Control and Purity: Our recipe champions a single ingredient: cheese. This means you control the quality and authenticity of what you're eating. No hidden starches, no strange oils, just the wholesome goodness of Parmesan. This makes them naturally gluten-free and a fantastic low-carb snack option, perfectly aligning with keto-friendly diets.
The Simplicity Factor: Your Quick Guide to Perfect Parmesan Crisps
You might think something so delicious and sophisticated would require intricate culinary skills, but the beauty of
parmesan crisps lies in their astounding simplicity. If you can grate cheese and operate an oven, you are more than qualified to create these cheesy masterpieces.
One Ingredient, Endless Possibilities (with a Crucial Tip!)
At its heart, this recipe calls for just one ingredient: Parmesan cheese. But not just any Parmesan will do. For the best results, always opt for a block or wedge of authentic Italian Parmigiano Reggiano. This cheese is known for its dry texture and robust, nutty flavor, which are critical for achieving that perfect crispiness and taste.
The Crucial Tip: Shred Your Own Cheese!
This cannot be stressed enough. Avoid the pre-grated Parmesan in the green plastic containers or even the refrigerated pre-shredded bags.
*
The Green Can: It’s too finely grated, preventing proper melting and crisping, and it contains anti-clumping agents that interfere with the desired lacy texture.
*
Pre-Shredded Bags: While better than the green can, these often contain cellulose or other additives to prevent sticking. This can lead to a less smooth melt and a less robust flavor.
Unlock Pure Flavor: The Secret to Perfect Homemade Parmesan Crisps delves deeper into why the quality and preparation of your cheese are paramount. Shredding your own cheese using the larger holes of a box grater ensures even melting and the best possible flavor and texture.
Lightning-Fast Prep & Bake Time
The entire process, from grating to cooling, is remarkably quick. You're looking at about 10 minutes of hands-on prep time (mostly grating) and then a mere 8-10 minutes in the oven. That's less than 20 minutes from craving to crunch! The oven truly does all the heavy lifting, transforming humble cheese shreds into golden, bubbly, crisp perfection.
Basic Equipment You'll Need:
* A baking sheet
* Parchment paper or a silicone baking mat (essential for non-stick)
* A grater (box grater or food processor attachment)
Elevating Your Crisps: Flavor Variations and Serving Suggestions
While the pure flavor of Parmesan is delightful on its own, homemade
parmesan crisps are incredibly versatile, inviting you to experiment with various seasonings and uses. They are far more than just a snack!
Seasoning Adventures:
Once you've mastered the basic crisp, the world of flavor is your oyster. Sprinkle your chosen seasonings over the cheese mounds *before* baking:
*
Herbal Harmony: A pinch of Italian seasoning, dried oregano, thyme, or rosemary pairs beautifully with the nutty Parmesan.
*
Spicy Kick: Red pepper flakes add a pleasant warmth and zest.
*
Aromatic Delights: A whisper of garlic powder or onion powder can enhance the savory profile.
*
Peppery Punch: Freshly cracked black pepper creates a "cacio e pepe" vibe, adding a sophisticated edge.
*
Smoky Depth: A tiny sprinkle of smoked paprika offers an intriguing layer of flavor.
*
Luxurious Touch: After baking and cooling, a very light mist of truffle oil can elevate them to gourmet status.
Beyond the Snack Bowl: Creative Uses for Your Crisps
Of course, devouring them straight from the cooling rack is a perfectly valid and highly recommended use. But these versatile crisps can do so much more!
Elevate Meals: Versatile Parmesan Crisps for Snacks, Salads & Garnish offers even more inspiring ideas.
*
Elegant Soup & Salad Toppers: Replace croutons with a few crisps for added crunch and flavor in soups (like tomato bisque or French onion) and salads (especially a Caesar). Their delicate structure makes them far more appealing than heavy bread.
*
Gourmet Garnish: Crumble them over pasta dishes, risottos, or roasted vegetables for a salty, cheesy finish.
*
Low-Carb Dippers: Their sturdy yet delicate nature makes them perfect for dipping into guacamole, hummus, or even a creamy spinach dip.
*
Charcuterie Board Stars: Add a touch of elegance and a delightful texture contrast to your cheese and charcuterie platters.
*
Appetizer Base: Use larger crisps as a base for mini canapés, topped with a dollop of crème fraîche and smoked salmon, or a pesto dab and a cherry tomato.
*
Breakfast Booster: Crumble over scrambled eggs or an omelet for a savory crunch.
Step-by-Step Perfection: Crafting Your Crisps
Ready to embark on your crisp-making journey? Here’s the simple process:
1.
Prepare Your Workspace: Preheat your oven to 400°F (200°C). Line a baking sheet with parchment paper or a silicone baking mat. This step is crucial to prevent sticking and ensure easy removal.
2.
Shred Your Cheese: Take your block of Parmigiano Reggiano and grate it using the larger holes of a box grater. Aim for consistent, medium-sized shreds.
3.
Portion the Cheese: Spoon tablespoon-sized mounds of shredded cheese onto the prepared baking sheet. Lightly spread each mound into a thin, roughly 2 to 3-inch circle. They don't need to be perfectly round; organic shapes are part of their charm. Ensure you leave at least an inch of space between each circle, as they will spread during baking.
4.
Season (Optional): If you're using any optional flavorings (like pepper, herbs, or red pepper flakes), sprinkle them evenly over the cheese circles now.
5.
Bake to Golden Perfection: Place the baking sheet in your preheated oven. Bake for 8 to 10 minutes, or until the crisps are golden brown around the edges and delightfully bubbly and lacy in the center. Keep a close eye on them, as oven temperatures can vary, and they can go from perfect to burnt quickly.
6.
Cool and Enjoy: Remove the baking sheet from the oven. Let the crisps cool on the baking sheet for 1-2 minutes; they will firm up as they cool. Then, carefully transfer them with a thin spatula to a wire rack to cool completely. This final cooling step is essential for achieving maximum crispiness.
Troubleshooting Tips for Flawless Crisps:
*
Why aren't they crispy? They might be underbaked, or your cheese might have too much moisture (e.g., pre-shredded or a softer cheese). Ensure they are golden brown and have cooled completely on a wire rack.
*
Why did they burn? Your oven might be too hot, or they were left in too long. Every oven is different, so adjust baking time accordingly.
*
Why did they stick? You likely didn't use parchment paper or a silicone mat, or you tried to remove them too soon before they had a chance to firm up slightly.
*
Storage: Store cooled
parmesan crisps in an airtight container at room temperature for up to 3-5 days. While they rarely last that long, they retain their crunch beautifully.
Conclusion
Making your own
parmesan crisps is one of the simplest, yet most rewarding culinary endeavors you can undertake. With minimal effort, you unlock a world of superior flavor, a delicate, lacy texture, and endless versatility that far surpasses anything you can buy at the store. Whether you're seeking a quick low-carb snack, an elegant garnish for your next dinner party, or just a burst of pure cheesy joy, these homemade delights are your answer. So, grab a block of good Parmesan, preheat your oven, and prepare to elevate your snacking and dining experience, one irresistible crisp at a time.